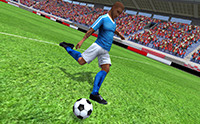
Complete soccer game development kit with customizable players, animations, stadiums, and equipment for building professional soccer games.Soccer Players & Stadiums Pack is a comprehensive game development kit specifically designed for creating professional soccer/football games. This complete package provides everything needed to build a fully-featured soccer game, from customizable players to stadium environments.Core ContentPlayer System: Features 10 distinct base player models with extensive customization options. Each player can be personalized with 19 different hairstyles, 50 skin tone variations, multiple uniform designs, and team-specific accessories. The modular design allows for thousands of unique player combinations.Animation Suite: Includes 69 professionally crafted animations covering all essential soccer actions - from basic movement and ball control to advanced goalkeeper maneuvers and special techniques like diving headers, tricks, and tackles. All animations are optimized for gameplay and smooth transitions.Stadium Environments: Two complete stadium models (day and night versions) with detailed crowds, lighting systems, banners, and atmospheric elements. The environments are designed to create an authentic soccer match atmosphere.Equipment & Props: Full set of soccer equipment including balls, goal posts, nets, and player gear, all with multiple texture variations for customization.Customization FeaturesHighly Customizable: The asset is built with modularity in mind. Players can easily:Mix and match player appearances using the extensive texture libraryCreate custom team uniforms and colorsAdjust player equipment and accessoriesModify stadium banners and crowd elementsTeam Setup: Includes pre-configured red and blue team setups (40 total prefabs) for immediate use, while allowing complete customization for unique team creation.Genre SuitabilityPerfect for Soccer/Football Games: Specifically designed for:Mobile soccer gamesPC/Console football simulationsArcade-style soccer gamesTraining and educational soccer applicationsVR soccer experiencesFlexible Implementation: The asset supports various soccer game styles from casual arcade games to more realistic simulations, thanks to its comprehensive animation set and customizable difficulty.Technical ExcellenceMulti-Pipeline Support: Compatible with both Built-in Render Pipeline and Universal Render Pipeline (URP), ensuring compatibility with modern Unity projects and Unity 6.Performance Optimized: All models and textures are optimized for real-time rendering across platforms, making it suitable for mobile development while maintaining visual quality.Professional Quality: Created by experienced game developers, the asset maintains consistent quality standards throughout all components, as confirmed by positive user reviews highlighting its completeness and professional construction.Ready-to-Use: Comes with pre-configured animation controllers, organized file structure, and comprehensive documentation (Japanese & English), allowing developers to start building immediately without extensive setup.This asset has earned praise from developers as containing "everything required to develop a complete soccer game" and is particularly valued for its quality, extensive customization options, and reliable publisher support.Character ModelsNumber of player models: 10 base player models with extensive customizationHair models: 19 different hairstylesRigging: Yes - Full body rigging with facial featuresUV mapping: Yes - Optimized UV layout for all modelsAnimationsAnimation count: 69 professional soccer animationsAnimation types:Player movements (run, walk, dash, jump)Ball control (dribble, trap, pass, shot)Goalkeeper actions (catch, punch, throw, dive)Special moves (tricks, headers, tackles)Celebration and reaction animationsTextures & MaterialsNumber of textures: 220+ high-quality texturesTexture dimensions: Various sizes optimized for performanceMaterial types:Diffuse materials for Built-in Render PipelineURP-compatible materials (Version 1.6.0)Custom shaders for special effectsTexture categories:Player customization (50 skin tones, 42 hair textures, 6 uniform variations)Equipment (gloves, shoes, socks)Numbers and team emblems (30 number textures)Stadium environments and crowdsStadium & EnvironmentStadium models: 2 complete stadiums (day/night versions)Polygon count: Optimized for real-time renderingIncludes: Crowds, lighting, banners, goal posts, soccer ballsPrefabs & OrganizationNumber of prefabs: 40 ready-to-use player prefabsTeam configurations: Pre-configured red and blue team setups (20 each)Modular design: Easy customization and team buildingCompatibilityUnity version: 5.5.2+ (tested up to Unity 6)Render pipelines: Built-in RP and URP supportPlatform: All Unity-supported platformsFile size: 78.1 MB (783 files total)Additional FeaturesAnimation controllers: Pre-configured for immediate useCustomization scripts: Tools for easy player customizationDocumentation: Complete setup and usage guides (Japanese & English)
ゲームアセットストアでは、高品質でリアルな3Dモデルと豊富なモーションを備えたサッカー選手とスタジアムを紹介しています。このアセットを使用すると、独自の本格的なサッカーゲームを作成するために必要なすべてのモデルとモーションが得られます。プレーヤーモデル(20 x 2チーム)は、10種類のトルソと19種類のヘアスタイルの組み合わせを変更することでアレンジできます。パッケージには70以上のモーションが含まれており、MecanimとLegacyアニメーションシステムの両方が含まれています。スタジアムモデルは、「Day」バージョンと「Night」バージョンで提供されています。さらに、それぞれに2つの異なるゴールモデルと4つのボールモデルが付属しています。プレーヤーやスタジアムのバリエーションを豊かにするのは、あなたの創意工夫次第です。
==========内容==========
【モデル一覧(平均ポリゴン数)】
-サンプルプレーヤーモデル20モデルx 2チーム
-プレイヤーモデル
-10種類の胴体モデル(2,000トリス)
-19種類のヘアモデル(500トリス)
-70種類のモーション
スタジアムモデル(9,000トリス)1タイプ×デイナイト
ゴールモデル(5,000トリス)2タイプ×デイナイト
-4種類のボールモデル(180トリス)
【モーション一覧】
-3D_45_in…45度回転
-3D_45_out…45度
-3D_90_in…90度回転
-3D_90_out…90度
-3D_135_in…135度回転
-3D_135_out…135度
-3D_180_turn…180度回転
-3D_back_head_finsh…ジャンプとバックヘッダー
-3D_back_head_start…バックヘッダー
-3D_back_run…逆方向に実行
-3D_ballstop…ボールストップ
-3D_dash…ダッシュ
-3D_falling…秋
-3D_fk_kamae…フリーキックスタンス
-3D_GK_bear…GKボールを保持
-3D_GK_down_catch…キャッチするGKスクワット
-3D_GK_front_catch…GK Catch in front
-3D_GK_kamae…GKレディポジション
-3D_GK_kick…GKキックボールを前方に
-3D_GK_over_throw…GKオーバースロー
-3D_GK_sidecatch_up…GK横にキャッチしてダイビング/アッパー
-3D_GK_sidecatch_mid…GK横から横にキャッチ/ミッド
-3D_GK_sidecatch_down…GKを横向きにキャッチして下げる/下げる
-3D_GK_under_throw…GKアンダースロー
-3D_guard…前を向いて後ろに対戦相手をマークする
-3D_heel…ヒール
-3D_infront…Infront
-3D_inside…内側
-3D_instep…甲
-3D_jump_insidehead…ジャンプとインサイドヘッダー
-3D_jump_head…ヘッダーのジャンプ
-3D_壁…壁
-3D_かまえ…スタンス
-3D_outside…外側
-3D_overhead…オーバーヘッドキック
-3D_short_pass…ショートパス
-3D_run…実行
-3D_guts…得点を喜ぶ
-3D_ショット…ショット
-3D_sidehead…Sidewaysヘッダー
-3D_sliding…スライド
-3D_standhead…スタンディングヘッダー
-3D_step…Step
-3D_スタンド…スタンド
-3D_tackle_f…前に足を突き刺す
-3D_tackle_s…タックル
-3D_throw_in…投入
-3D_trap_bust…チェストトラップ
-3D_trap…Trap
-3D_trap_turn_90…トラップと90度回転
-3D_turnshot_r…回転して撃つ
-3D_volley…ボレー
-3D_wakeup…上昇
-3D_ウォーク…ウォーク
-3D_stagger…Stagger
-3D_cut_wakeup…インターセプト&ライズ
-3D_dribble_run_lp…走ってドリブル
-3D_dribble_dash_lp…ダッシュ&ドリブル
-3D_GK_punch_mid…中央にGKパンチ
-3D_GK_punch_down…GKパンチを下に
-3D_GK_punch_up…GK上にジャンプしてパンチ
-3D_GK_punch_side_mid…GK右中央にジャンプしてパンチ
-3D_GK_punch_side_down…GK右下にジャンプしてパンチ
-3D_GK_punch_side_up…GK上方向に右にジャンプしてパンチ
-3D_GK_wakeup_noball…ボールのないGKライズ
-3D_GK_wakeup…GKライズ
-3D_wall_jump…壁ジャンプ
-3D_trick_00_roulette…フェイントルーレット
-3D_trick_01_elastico…Feint Elastico
-3D_trick_02_scissors…フェイントシザーズ
-3D_diving_header…ダイビングヘッダー
(71回以上のモーション)
==========使用方法/データのセットアップ==========
1.胴体モデルの使用/設定方法
各プレーヤーの胴体モデルフォルダー「model _ ***」は、AssetBundleResources> player> player_modelにあります。胴体モデルフォルダーでメッシュデータ「model _ ***。fbx」を見つけて、階層に配置します。配置されたメッシュデータの階層で[Ploymesh]> [モデル_ ***]を選択すると、各パーツのマテリアルが[インスペクター]> [スキニングメッシュレンダラー]に表示されます。
このセクションでは、胴体モデルの各材料について詳しく説明します。材料は次の部分に分かれています。
a)皮膚…皮膚
b)グローブ…ゴールキーパー用グローブ
c)num_Left…ジャージ番号のデカール(左)
d)num_Right…ジャージ番号のデカール(右)
e)靴…サッカーシューズ
f)靴下…靴下
g)チーム…チームエンブレムのデカール
h)un_up…ジャージー(上)
i)un_dn…ジャージー(下)
a)皮膚
スキンを設定するときは、スキンマテリアルの[インスペクター]> [シェーダー]に移動して、「レガシーシェーダー/拡散」を設定し、ベースとして「skin _ *** _ ** _ ** _ ***。png」を割り当てます(RGB )Trans(A)。肌の質感は、顔のタイプ、肌の色、あごひげの有無、タトゥーの有無で分けられます。
b)手袋
ゴールキーパーに手袋を追加する場合は、手袋のマテリアルの[インスペクター]> [シェーダー]に移動して、[レガシーシェーダー/拡散]を設定し、手袋のテクスチャ「glove _ *** _ **。png」をベース(RGB)トランス( A)。ゴールキーパーに手袋を追加したくない場合は、手袋素材の「インスペクター」>「シェーダー」に移動して「レガシーシェーダー/透明/拡散」を設定し、「glove_000_00.png」を割り当てます。ベース(RGB)トランス(A)として。
c、d)num_Left、num_Right
ジャージー番号には、左側に「num_Left」素材、ジャージー番号の右側に「num_Right」という2つのタイプがあります。 Inspector> Base(RBG)で使用する「Jersy(Top)」のテクスチャ「un_up _ *** _ **。png」を割り当てます。ジャージーに数値を追加する場合は、インスペクター> num_Leftまたはnum_Rightのシェーダーを "DecalUV2"に設定し、インスペクター> Decal(RGBA)に移動して、ジャージーのテクスチャとして "num _ *** _ **。png"を割り当てます数。ジャージ番号を追加しない場合は、Inspector> Decal(RGBA)のテクスチャを「None」に設定してください。
e)靴
サッカーシューズを追加するときは、靴の素材の[インスペクター]> [シェーダー]を「レガシーシェーダー/拡散」に設定し、靴のテクスチャ「shoe _ *** _ **。png」をBase(RGB)Trans(A)に割り当てます。
f)靴下
靴下を追加するときは、靴下素材の「インスペクター」>「シェーダー」を「レガシーシェーダー/拡散」として設定し、靴下テクスチャ「sock _ *** _ **。png」をBase(RGB)Trans(A)として割り当てます。
g)チーム
チームエンブレムを追加する場合は、チームマテリアルの[インスペクター]> [シェーダー]を "DecalUV2"に設定し、インスペクター>ベース(RBG)で使用するジャージー(トップ)のテクスチャを割り当てます。次に、Inspector> Decal(RGBA)でチームエンブレム "team _ ***。png"にテクスチャを割り当て、チームエンブレムをジャージに配置します。ジャージにチームエンブレムを追加しない場合は、[インスペクター]> [デカール(RGBA)]でテクスチャを[なし]に設定します。
h、i)un_up、un_dn
ジャージーマテリアルは上部セクションと下部セクションに分かれています。「un_up」マテリアルはジャージの上部用で、「un_dn」マテリアルはジャージの下部用です。 un_upとun_dnの両方で、「インスペクタ」>「シェーダー」を「レガシーシェーダー/拡散」として設定し、ジャージーのテクスチャ(上)をun_upマテリアルに「un_up _ *** _ **。png」、ジャージーのテクスチャ(下)を割り当てます。 un_dn _ *** _ **。png "(Inspector> Base(RBG)のun_dnマテリアル)。
胴体モデルの各マテリアルは、AssetBundleResources>プレーヤー> player_model>マテリアルのパーツによってまとめられます。マテリアルは各テクスチャで使用できるため、ドラッグアンドドロップしてシーンの胴体モデルの各部分に適用することもできます。
AssetBundleResources> player> player_prefabsに合計40(20 x 2チーム)のプレーヤーモデルサンプルがあります。階層に「model _ * _ ***。prefab」をドラッグ&ドロップすることで使用できます。
2.ヘアモデルの使用方法
ヘアモデルフォルダー「hair _ ***」は、AssetBundleResources>プレーヤー> hair_modelにあります。ヘアモデルをプレーヤーモデルに組み込むときは、メッシュデータ「hair _ ***。fbx」と胴体モデル「model _ ***」を階層に配置します。胴体モデルのジョイント階層内のroot> Hips> Spine> Spine1> Neck> Headに "hair _ ***。fbx"を格納すると、髪モデルが胴体モデルの頭に正常に配置されます。 Inspector> Shaderを "Custom / GzTransparentDiffuseEx"として設定し、ヘアテクスチャ "hair _ *** _ **。png"をBase(RGB)Trans(A)として割り当てます。インスペクタ内のカリングを「なし」、ZWriteを「オン」、ZTestを「LEqual」に設定します。
それらをドラッグアンドドロップして、AssetBundleResources>プレーヤー> hair_model> hair _ ***>マテリアルのシーンのヘアモデルに適用することもできます。
3.モーションの使い方
モーションはAssetBundleResources>アニメーションに保存されます。 Animator Controllerを作成し、各モーションのFBXファイルをAnimatorウィンドウにドラッグアンドドロップします。
4.スタジアム、ゴール、ボールの使い方
スタジアムモデルには、デイバージョンとナイトバージョンが付属しています。スタジアムモデルはAssetBundleResources>モデル>スタジアムにあるため、st _ ***> Prefabsの "st _ *** _ stadium_all.prefab"を階層にドラッグアンドドロップできます。
2つの異なる目標モデルがあり、それぞれにDayバージョンとNightバージョンが付属しています。
ゴールモデル「st_goal _ ** _ *。prefab」は、AssetBundleResources>モデル>スタジアム> st_Goal>プレハブにあります。ボールモデルは「st_ball _ ***。prefab」で、AssetBundleResources>モデル>スタジアム> st_Ball>プレハブにあります。スタジアムモデルと同じように、階層にドラッグアンドドロップして使用できます。
このセクションでは、スタジアムの材料と目標について詳しく説明します。スタジアムのいくつかの素材とゴールは、プレーヤーのモデルが配置されたときにリアルタイムで影が表示されるように設定されています。インスペクター>各モデルのマテリアルのシェーダーは「レガシーシェーダー/拡散」です。 LightMapのテクスチャは、スタジアムモデルとゴールモデルに含まれています。ライトマップシェーダーを使用する場合は、各マテリアルのインスペクター>シェーダーを「レガシーシェーダー/拡散」から「アンライト/ライトマップ」に変更してください。スタジアムのPrefab "st _ *** _ studium_all.prefab"階層の各モデルのインスペクター>メッシュレンダラーでキャストシャドウをオフにしてください。同様に、ゴールモデルについては、プレハブの「st_goal _ ** _ *」階層の「pole *」で、Cast Shadows of Inspector> Mesh Rendererをオフにしてください。
5.空の設定方法
[ウィンドウ]> [ライティング]> [設定]からライティングの設定を開き、環境の下のスカイボックスマテリアルから、関連するスカイマテリアル「st _ *** _ skybox」を設定します。
AssetBundleResources> Scenesで、Skyboxマテリアルが昼間/夜用にプリセットされたシーンを追加しました。
[ビデオ]
【サッカー選手・ユニフォーム拡張パック】、【サッカースタジアム拡張パック】もございます。
