



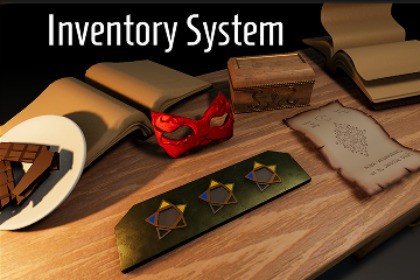
This inventory system for 3D puzzle games will help you develop great games, set up item interactions, and save time. A well-thought-out set of features that covers the core tasks of 3D puzzle items.This inventory system for 3D puzzle games will help you develop powerful games, set up item interactions, and save time. You will find a well-thought-out, optimized set of features that covers the core tasks of 3D puzzle items and is easy to use.To integrate into your game, you can simply use my Canvas prefab: InventorySystem/Prefabs/Canvas.prefabIt would be great to watch a video where everything is explained in just as much detail: https://youtu.be/-CRAjymxFWcPossible workflow:Add Canvas prefabCreate and configure item assetAdd ItemPickup to the 3D objectSet up a new ItemLet's get started setting up a new item. First, create a new item asset in the “items” folder.How to create a new item asset: Right-click > Create > Item > Create New ItemItems can have 2 types of functionality:1. Drag and Drop2. Document-type (Turn objects on and off)About Drag and Drop. This functionality means that a 3D item can spawn in the Scene when you drag it out of inventory. To make your item Drag-and-droppable, you need to turn on the bool InventoryItemDrag in the inspector of the item asset.Examples of items: 3D wooden runeUse: For example, you use Drag and Drop items when you need to take a wooden rune in the inventory and place it in the right position on a table.Deep dive:The drag-and-drop item logic allows for much more; I created an example in the sample scene where you have three runes. Let's open one of them, Ansuz./Examples/Runes/Ansuz/Ansuz.assetAs you can see, the HasPreconditionalPlayerPref bool is turned on. That means that we cannot pick up an item until a certain PlayerPref has a specific value.Also, the rune item has two arrays that help us to spawn the item object in the Scene. The first array, called Spawn Position, contains exact world transform positions where the item will be instantiated. Ansuz has three positions where it is possible to spawn. The second array, called WhereCanSpawn, contains empty objects' colliders. While hovering over an object's collider, the mouse can release an item to spawn it at SpawnPosition[i].When the item object is spawned, in the InventoryItemDrag script PlayerPref with a name that contains [item.id], and the string IsOn is set to the index of the element of the WhereCanSpawn array.PlayerPrefs.SetInt(item.id + "IsOn", i);[i] is an element of the WhereCanSpawn array.This means you can check whether the item is spawned at the aimed position or not. To do this, after the rune is spawned, I need to call a method, for example, CheckIfRunesSolved, from the runes controller. I turned the HasAfterSpawnScript bool value on and attached the script. After the rune is spawned, the AfterSpawn method will be called automatically.I also enabled the HasAfterGetScript bool, because there is a high chance that we will place the rune in the wrong position and will want to get it back in the inventory. In that case, the PlayerPref set after spawning must then be cleared or changed; in my case, to -100.About Document-type. This functionality means the item activates certain objects in the Scene. You can open Inventory, click on the item to turn an object on, and click again to turn the object off. To make your item of this type, you need to turn on the bool ItemCanTurnOnAndOffObjects in the inspector of the item asset.Examples of items: document to read, magic maskUse: For example, you use the Document-functionality item when you have a document in the inventory and need to read it by clicking on the item. When you click on the item, an image appears, and you can read. Click again, and the image turns off. Another example is when you have a magic mask in the inventory. You click on the item, and the mask`s lens appears because you are wearing the mask. Click on the item again (take off the mask), and the mask`s lens is hidden.Note: The item can have both Drag and Drop and Document-type functionality at the same time. For example, you have paper with information you can read, and you need to place this paper on a plate (or a table, wall, etc.).As you can see, this functionality has two fields: the ObjectToTurnOnAfterClick and the SpawnParentName. In the first field, we drag the prefab of the object we want to turn on, and in the second, we write the name of the object that exists in the Scene, and that will be the parent of the newly instantiated object.Nice, we know how to create an item asset; a perfect item asset. It is like the soul and brain of a 3D item. Now we need to breathe this soul into a real 3D object, so that we can collect it in a Suitcase.Item Pickup. To make a 3D object pickUp-able, you need to: 1. Make sure that this 3D object has a collider; 2. Add the ItemPickup script to it.DependenciesPackages: TextMeshPro Input: Uses standard Unity EventSystemsThank you for reviewing the instructions for the TimeBeCreative Inventory System. I truly hope your games are nothing short of groundbreaking and touch the hearts of thousands. Wishing you success and joy; remember to be happy - you're gonna make great things.TimeBeCreativeCore item functionality: Drag and Drop, Document-type (Turn objects on and off)Item examples count: 5Item examples list: 3 runes, magic mask, documentCount of main Inventory system scripts: 11Count of scripts to set up sample scene: 3Count of scripts to customize Editor: 2Count of inventory prefabs: 3 (Canvas, Item, Suitcase)Count of 3D prefabs: 12 (3 runes, 2 books, box, plate, chocolate, paper, mask, runes platform, table)Sprites: suitcase icon, warning sprite for suitcase (to notify about adding new items to the inventory)Materials to set up Sample Scene: 16Documentation and sample scene includedLink to the GitHub repository with documentation: https://github.com/TimeBeCreative/inventory-system-documantation