

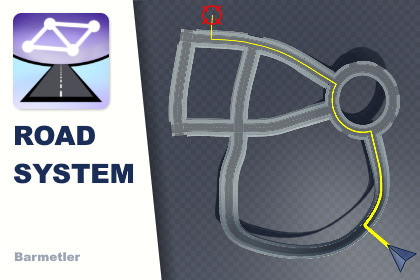
Create and shape curvy roads, connect them to intersections, and calculate the shortest Path to the goal! Useful for minimaps, or vehicle AI.As this package is not a collection of models and textures, but a tool, SRP compatibility is irrelevant. You are intended to use your own models, however, the package comes with some samples that use the Built-in Render Pipeline.This package allows you to create custom roads in any modelling software, and tile them along a custom bezier curve. The curves are easy to manipulate, and can be connected to intersections. This package includes tools for moving and rotating points along the road, as well as a freestyle spline tool that you might know from image manipulation programs.Once you're done with your roads, you have a graph with correct edge weights which can then be used to plot the shortest path from any point to any other point. This path can be displayed on a minimap, or used in any other way you can come up with.The package includes premade roads and intersections, but you can make your own, as described in the documentation.~~~~~~~~~~~~~~~~~~~~~~~~~~~~~ MIGRATION TO VERSION 2 ~~~~~~~~~~~~~~~~~~~~~~~~~~~~~MAKE A BACK-UP OF YOUR PROJECT TO BE SAFEDelete the entire folder in `Assets/Barmetler`.This will temporarily result in invalid references in your project, which is fine for now.Update and import the new Asset, which will now reside in the `Packages` folder.If you have not used any pre-made roads, materials, prefabs, etc, you are done here. If you have, continue with step 5.Open the package manager under Window>Package Manager.From the drop-down in the top left, where it says "Unity Registry" or "My Assets", etc. select "In Project"."Road System" should show up there, click on itNavigate to the "Samples" tab and import the sample that is there. It contains the Textures, Materials, Meshes, and Prefabs that were previously in the "Demo" folder, as that is how UPM packages work. These samples maintain the same GUIDs as previously, meaning that instantiated prefabs in your scene will be fine again.Advantages: UPM packages have a standardized format and are better suited to tools. They can also reside outside your project, if you want. Their dependencies to other packages from the Unity Registry are automatically installed.Explanation: Unity Assets refer to other Assets by their GUID. The GUID of an asset is specified in its corresponding `*.meta` file.For a seamless migration, the GUIDs of the scripts, prefabs, materials, etc that now reside in `Packages` maintain the same GUIDs of the ones in the `Assets` folder.However, two assets with the same GUID can not exist, which Unity "solves" by simply generating new GUIDs, keeping the link between your existing assets. This will break the link between your assets and the ones in the `Packages` folder.Therefore, it is very important that you DELETE the assets in the `Assets` folder before re-importing the new version, the GUIDs will stay the same. This was the easiest way to facilitate the migration.As long as no GUIDs change, the migration should have no side effects.As stated before, MAKE A BACK-UP OF YOUR PROJECT TO BE SAFE.FeaturesCreate and shape roads easilyUse and model of your liking for the roadsPathfinding using A*Smooth line generationAPI is easy to understand and useDocumentationhttps://www.barmetler.com/projects/road-system