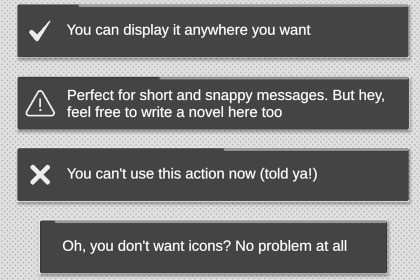
Toast Notification Message: Display short, customizable messages anywhere on screen. Perfect for instant feedback and dialog in Unity games!🚀 Toast Notification Message plugin for Unity 🚀The Toast Notification Message is a Unity plugin that provides a simple and effective way to display toast-style messages in your game. With this plugin, developers can easily show short and informative messages anywhere on the screen. Messages can be customized with text, icons, and more!Key Features:📝 Customize messages with text and icons.⏰ Set message duration or allow indefinite display.🖱️ Pause timer on mouse hover.✨ Hide messages with a simple click (including via code).With a user-friendly interface and flexible customization options, the Toast Notification Message is perfect for providing instant feedback, communicating important information, or simply adding a touch of interactivity to your game.📚 User Guide —👨💻 How to Use This Plugin in Your Project:🎬 Check the video tutorial: click here.In your project, create an empty object in the hierarchy, within a Canvas. This object can have any name, but a suggestion is to name it "ToastNotificationMessage". Add the CanvasGroup component to it so that the Fade effect can occur.Add the C# script ToastNotification.cs to the new ToastNotificationMessage object.The script requires the prefab of the message that will be displayed on the screen. In the root folder of this plugin, there are two prefabs (DefaultMessageModel[and Small]). Choose one of the two and drag it into the "Message Prefab" field of the script.In the ToastNotification script, you can configure how you want the messages to be displayed by default in your game.To display a message on the screen, simply call the Show function within ToastNotification anywhere in your code. See bellow.It is recommended to restart the editor.⭐ Examples:Simple message:ToastNotification.Show( "Hello, world!" );With icon:ToastNotification.Show( "Hello, world", "info" );Custom time:ToastNotification.Show( "Hello, world", 6.5f );Complete message with time and icon:ToastNotification.Show( "Hello, world", 5f, "error" );🚦 Dependencies:This asset has a dependency on TextMeshProUGUI installed to work (version 2 or higher [recommended version 3 or higher])🔴 Attention: if the letters are still not appearing, you need to update the version of your TextMeshProUGUI.Access the Window menu > Package Manager > Select Packages: Unity Registry (top left menu) > Search for TextMeshProUGUI > Click Update to [latest version] (top left corner)🌠 Utilities:Available icon names: success, error, alert, info.You can add your own icon by opening the prefab you're using and adding it as a child object of the Icons object.If you show a message passing zero as the time value, the message will be infinite on the screen until dismissed. Example: ToastNotification.Show( "Hello, world", 0 );You can close/dismiss any message on the screen using the command ToastNotification.Hide();To create your own message prefab, duplicate one of the existing prefabs and make your changes. It's recommended to only change the background color, screen size, and message size. Anything else may not be compatible with the script that handles messages on the screen. Also, always keep the position, pivot, and anchor set to zero.Remember to properly organize the hierarchy of your Canvas so that messages can overlay all elements on your screen, if desired.For additional details and more usage tips, read Technical Details section bellow.The project has been removed from Github (ver 1.1). For suggestions for improvements or corrections, please contact me through my public information here on my Unity profile 💜Upon importing this asset, you will receive the main project folder:📁 ToastNotificationMessageMain directoryThis asset has a dependency on TextMeshProUGUI installed to work (version 2 or higher)🔴 __Attention:__ if the letters are still not appearing, you need to update the version of your TextMeshProUGUI. Access the Window menu > Package Manager > Select Packages: Unity Registry (top left menu) > Search for TextMeshProUGUI > Click Update to [latest version] (top left corner)📖 Tutorial folderThis folder contains demonstration files of the plugin and how it works, a copy of this description file in PDF and a readme.md file. You can explore the C# file (ShowCase.cs) to better understand how functions are called to be displayed on the screen. This file contains some comments with tips and suggestions that can help you.This folder serves as a guide only. You don't need to import it if you don't want to.🎭 Icons FolderContains the icons used in this plugin. You can add new icons here, which is recommended for the organization of your project, but you can also use plugins from other locations and folders of your project. To add new icons, simply add them as child objects of the Icons object, present inside the DefaultMessageModel (and Small) prefab. If you do this, remember to maintain the standard icon size.🛠️ Prefabs fileIn the root folder of this plugin, you will find two prefabs: DefaultMessageModel and DefaultMessageModelSmall. The only difference between them is the size, one with larger messages and the other smaller. These are the prefabs that will be loaded on the screen for the player. You can change them as you wish to create your own prefab, just be careful with the components of the objects, especially their position and anchor (always keep them at zero, as the responsible script will organize them on the screen later).📜 Scripts C# fileFinally, in the root folder, you will find two C# files: ToastNotification.cs, ToastNotificationMessage.cs. The main file is ToastNotification.cs, which is responsible for loading messages on the screen and also for calling ToastNotificationMessage.cs (by the way, avoid manipulating variables from this file). From the ToastNotification.cs file, there are some static and public variables that you can manipulate at runtime through code. Feel free to do so! Inside this file, there are also special notes such as comments that can help you better understand how this plugin works.


